Author: Callum Reyes

  • How Do Independent Record Labels Sign Artists: An Insider Guide

    How Do Independent Record Labels Sign Artists: An Insider Guide

    I spent seven years running A&R for a boutique indie imprint in Brooklyn, and I saw thousands of demos hit our inbox. The romantic myth claims an executive stumbles into a dive bar, hears one chorus, and hands over a check on a cocktail napkin.

    In reality, understanding how do independent record labels sign artists comes down to recognizing a methodical, low-overhead risk assessment. Independent labels operate on tight margins. We sign acts when creative identity aligns with operational leverage.

    The Scouting Phase: How Indie A&R Finds Unsigned Talent
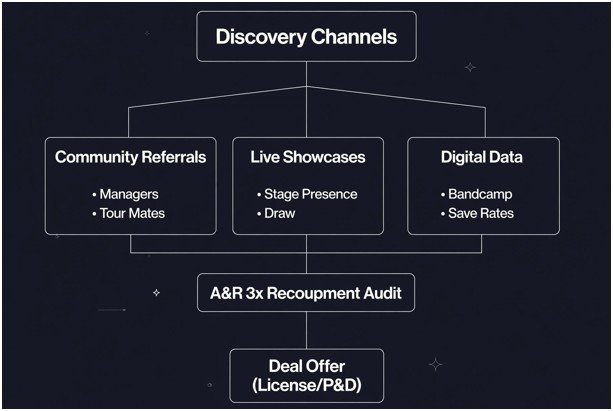
    The Scouting Phase: How Indie A&R Finds Unsigned Talent

    Indie labels rarely use open calls. We source music through closed loops, personal networks, and targeted digital monitoring.

                        ┌──────────────────────────────┐

                         │     Discovery Channels       │

                         └──────────────┬───────────────┘

                                        │

             ┌──────────────────────────┼──────────────────────────┐

             ▼                          ▼                          ▼

      Community Referrals         Live Showcases             Digital Data

     (Managers, Tour Mates)     (Stage Presence, Draw)    (Bandcamp, Save Rates)

             │                          │                          │

             └──────────────────────────┼──────────────────────────┘

                                        ▼

                         ┌──────────────────────────────┐

                         │   A&R 3x Recoupment Audit    │

                         └──────────────┬───────────────┘

                                        │

                                        ▼

                         ┌──────────────────────────────┐

                         │   Deal Offer (License/P&D)   │

                         └──────────────────────────────┘

    Digital Footprints Over Vanity Metrics

    I never cared about raw follower counts. Viral spikes on short-form video often fail to sell concert tickets or vinyl records. Instead, I analyzed listener retention and community engagement.

    We look for high listener-to-follower ratios on Bandcamp and Spotify. If 3,000 people stream your record weekly and buy physical merch, you possess a viable foundation. For artists deciding between DIY momentum and label infrastructure, reviewing an independent artist revenue split provides vital perspective before taking meetings.

    The Live Show Litmus Test

    A recorded track can be tuned, comped, and polished. A live performance cannot hide behind studio production.

    I scouted local rooms like Baby’s All Right or The Echo to witness how an artist commands silence between tracks. If an act brings 40 dedicated fans who purchase cassette tapes and sing every lyric, that proves cultural resonance. 

    The Worldwide Independent Network (WIN) reports that independent labels account for over 40% of the global recorded music market, fueled primarily by these hyper-engaged local communities.

    The Evaluation Rubric: What We Look for Before Offering a Deal
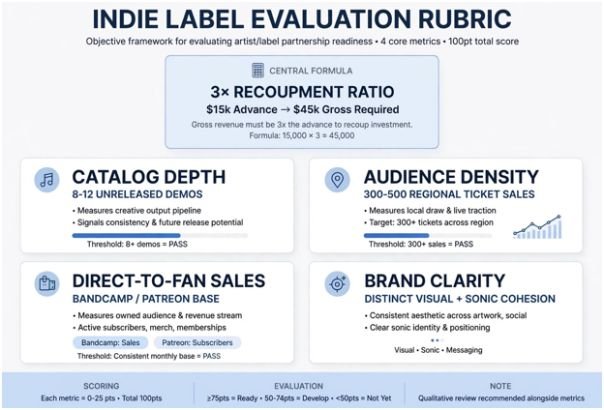
    The Evaluation Rubric: What We Look for Before Offering a Deal

    Before drafting an offer letter, my team ran prospective signings through an internal underwriting process:

    Metric Target Benchmark Why It Matters
    Catalog Depth 8–12 unreleased demos Guarantees release pacing without studio stalling.
    Audience Density 300–500 regional ticket sales Proves fans will travel and spend money on the project.
    Direct-to-Fan Sales Established Bandcamp/Patreon base Confirms recurring audience buy-in beyond passive streaming.
    Brand Clarity Distinct visual and sonic cohesion Reduces marketing costs needed to define the artist narrative.

    We applied a metric I call the 3x Recoupment Ratio. If an artist required a $15,000 advance and press budget, our financial projections needed to show a high probability of generating at least $45,000 in gross master revenue across 24 months. If the projections stalled at breakeven, we passed.

    Deal Architectures: Structuring the Agreement
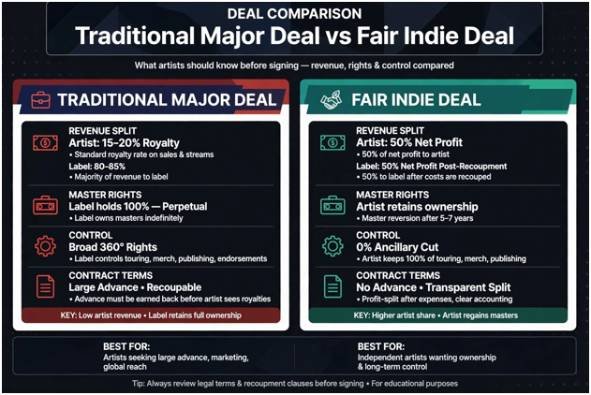
    Deal Architectures: Structuring the Agreement

    When we chose to sign an artist, our agreements looked fundamentally different from major-label corporate contracts. We prioritized flexible structures over predatory acquisitions.

                        Traditional Major Deal vs. Fair Indie Deal


      [ Major Label Deal ]

      Revenue:  Artist: 15-20% Royalty  │  Label: 80-85% + Master Rights (Perpetual)

      Control:  Broad 360 rights (touring, merch, publishing)


      [ Fair Indie Deal ]

      Revenue:  Artist: 50% Net Profit   │  Label: 50% Net Profit (Post-Recoupment)

      Control:  Master reversion after 5-7 years; 0% ancillary cut

    Net Profit Splits (50/50)

    The standard indie contract is a 50/50 net profit split. The label finances mixing, mastering, physical manufacturing, and PR. Once the label recoups those specific, itemized costs, every dollar of net revenue gets divided equally.

    The catch sits inside the accounting definition of “net.” Artists must negotiate strict spending caps. Without mutual expense approval, a label can charge internal operational overhead against the project’s gross income, preventing the artist from receiving royalties.

    Exclusive Licensing vs. Outright Master Assignments

    I advised every musician entering our office to avoid assigning their sound recording copyrights in perpetuity. The U.S. Copyright Office treats sound recordings as distinct intellectual property assets.

    A fair indie deal licenses the master recordings to the label for a defined term—typically five to seven years. After that term expires, commercial rights revert entirely to the artist. If a label insists on owning the master forever, walk away.

    Closing the Deal: Negotiation to Ink

    The contract stage separates casual hobbyists from career professionals. The signing process follows four direct steps:

    1. The Memo of Understanding (MOU): We issued a one-page term sheet outlining the advance, royalty split, territory, and term duration.
    2. Legal Due Diligence: The artist hires an entertainment attorney to redline the long-form contract. Never sign an agreement using the label’s in-house counsel.
    3. Neighboring Rights Registration: Both parties map out metadata collection through SoundExchange to ensure non-interactive digital performance royalties flow smoothly.
    4. Calendar Integration: The project moves to the production schedule. If the artist prefers complete autonomy, consulting a self releasing an album checklist clarifies whether self-distribution beats a label partnership.

    Don’t Sign Away Your Soul: The Final Cadence

    A record deal is not a validation stamp; it is an unsecured business loan paid back with your creativity.

    Independent record labels can amplify your vision, open doors to sync licensing, and place your records into physical shops worldwide. However, they cannot manufacture momentum out of thin air. 

    Build your audience, track your financial metrics, and treat your catalog like equity. When the label calls, ensure you negotiate as an established partner rather than a desperate applicant.

    Frequently Asked Questions

    1. Do indie labels pay advances to new artists?

    Yes, indie labels offer modest advances ranging from $1,000 to $20,000, which are fully recoupable against future streaming and sales royalties.

    2. How do independent record labels find artists?

    Indie labels discover acts through live venue scouting, peer artist referrals, Bandcamp discovery tags, and direct electronic press kit submissions.

    3. Do indie labels own your master recordings?

    Reputable indie labels license masters for a limited term of 5 to 7 years rather than owning the recording copyrights permanently.

    4. Can an artist leave an indie record deal early?

    An artist can exit early only if the label breaches contractual duties or through a negotiated buyout agreement.


  • Behind the Song Stories From Independent Songwriters: The Stories That Shape Their Music

    Behind the Song Stories From Independent Songwriters: The Stories That Shape Their Music

    I have always found myself listening differently when I learn what was happening in a songwriter’s life when a track was written. A simple lyric can feel more specific, and a familiar chorus can carry different weight once its origin comes into focus.

    I have also noticed that independent music makes these discoveries feel unusually close. It is revealing to hear how a songwriter turned a conversation, memory, difficult season, or half-formed idea into a recording. The backstory does not explain everything, but it opens another door into the music.

    Where a Song’s Story Usually Begins

    A song rarely starts as a perfectly formed narrative. It may begin with a line in a phone, a melody hummed while driving, an image that refuses to disappear, or a feeling needing somewhere to go. Everyday experiences can become valuable creative material when there is room to follow an idea before judging its commercial potential.

    That does not mean every song is autobiographical. A real experience may provide the spark while finished lyrics change the setting, characters, timing, or details. The songwriter is shaping it into something that works musically.

    Personal experience can give a song emotional specificity. Heartbreak, loneliness, friendship, family memories, or ordinary moments become compelling when writing focuses on concrete details. One small image can communicate more than a page of explanation.

    Turning a Moment Into Music

    Turning a Moment Into Music

    The interesting part is what happens after inspiration arrives. A songwriter must decide what belongs in the song and what stays outside it. A powerful memory may produce many lines, but only one might fit the rhythm, melody, perspective, and emotional direction.

    Editing becomes part of the storytelling. Strong songwriting often depends on removing explanations, tightening images, changing a word, or leaving something unsaid. The finished track may feel effortless, even though the writing involved repeated revisions.

    The music itself can change the story too. A quiet arrangement can expose an intimate lyric, while guitars, layered vocals, electronic textures, or rhythmic shifts can change its emotional character. Independent songwriting can feel open-ended because choices do not always have to fit a fixed genre template.

    The Parts Listeners Never Hear

    A finished track hides much of its history. Early demos may contain different lyrics, unfinished melodies, temporary arrangements, or performances that capture an emotion the polished recording later reshapes. Some ideas disappear. Others survive in details listeners may never recognize.

    Recording can become another stage of storytelling. An artist might change the tempo, remove an instrument, invite another musician to add a part, or keep an imperfect vocal because it feels more truthful. These choices can make the recording feel less like a transcription and more like a new version.

    Independent artists can use this flexibility to make unusual combinations work. A songwriter who moves between folk, alternative rock, electronic pop, soul, or acoustic music does not necessarily need to choose one identity for every song. That creative freedom connects naturally with the return of storytelling in modern alternative songwriting, where narrative detail can matter as much as sonic atmosphere.

    When the Original Story Changes

    Once a song leaves the songwriter’s hands, its meaning becomes less controlled. Listeners bring their own memories and emotions to the lyrics. A song about one person can become someone else’s breakup song. A lyric inspired by anxiety can become a source of comfort for somebody dealing with a different experience.

    That gap between intention and interpretation makes songwriting powerful. Knowing the backstory can add context, but it should not erase the listener’s response. A song story can explain where an idea began without closing down what the song can mean later.

    The same principle applies to genre. A songwriter may start with a folk narrative, add a pop hook, and discover that the finished track sits between categories. For artists working across styles, writing lyrics for genre blending and alternative pop can help preserve a clear emotional story even when the musical language keeps shifting.

    Why Independent Songwriter Stories Matter

    Why Independent Songwriter Stories Matter

    Independent songwriting stories reveal the work behind a track without separating music from ordinary life. They show that creativity can grow from routines, setbacks, friendships, travel, family memories, or a passing observation.

    They also make the songwriting process less mysterious. An artist-led account can reveal that a song began quickly but took years to record, or that a simple lyric required extensive editing. One independent songwriter describes songs growing from travel, family, environmental concerns, and personal struggles, while explaining recording and arrangement decisions.

    That combination of personal history and craft makes behind-the-song storytelling interesting. It reminds listeners that music is both emotional expression and construction. A feeling may start the process, but choices about words, melody, rhythm, instruments, and arrangement turn it into something another person can hear.

    FAQs: Behind the Song Stories From Independent Songwriters: The Stories That Shape Their Music

    1. What are behind-the-song stories?

    They are accounts of the experiences, ideas, creative decisions, and recording processes that shaped a song. They can explain its inspiration without limiting how listeners interpret it.

    2. Do independent songwriters write only about personal experiences?

    No. Independent songwriters may use fiction, observation, imagination, social issues, memories, or other people’s experiences. Personal material is common, but not the only source of inspiration.

    3. Why do songwriters edit their lyrics so much?

    Editing helps improve rhythm, clarity, imagery, emotional impact, and storytelling. Removing a line can sometimes make a song feel more powerful than adding another explanation.

    4. Can knowing a song’s story change how it sounds?

    Yes. Context can make listeners notice particular lyrics, emotions, or production choices. The listener’s own interpretation can remain.

    The Story Behind the Song Is Part of the Music

    What stays with me most is how a finished song can hold several versions of the same story at once. There is the experience that sparked it, the version reshaped through writing, the recording created through countless decisions, and the meaning a listener eventually brings to it. None of those versions has to completely replace the others. Together, they show how experience becomes shared culture.

    That is why the stories behind independent songs are worth hearing. They make the music feel closer, while leaving space for listeners to make it their own.

  • Emerging Artist Meaning: What the Term Really Says About Music Career

    Emerging Artist Meaning: What the Term Really Says About Music Career

    An artist can be 25, 45, or 70 and still be described as “emerging.” That is one of the most important facts hidden behind the label. The emerging artist meaning has much less to do with age than many people assume. In the U.S. art world, it generally describes a creator who has moved beyond making art casually and is developing a professional practice, but has not yet built the sustained recognition associated with a mid-career or established artist.

    That distinction matters because galleries, residencies, grants, fellowships, museums, and arts organizations often use career-stage labels when deciding who qualifies for opportunities.

    What Does Emerging Artist Mean?

    An emerging artist is usually someone in the early or developing stage of a professional artistic career. They are actively producing work, developing a recognizable practice, and beginning to accumulate public evidence of that work through exhibitions, performances, publications, commissions, sales, awards, residencies, or media attention.

    Developing a recognizable artistic identity extends beyond the work itself; for musical artists, it can also encompass deliberate choices about public presentation and identity, including how do bands choose their name to establish a distinctive and memorable presence.

    There is no universal definition. The New York Foundation for the Arts notes that terms such as emerging, mid-career, and established can mean different things depending on the organization using them. An emerging visual artist might have several exhibitions but no major gallery representation, while an emerging writer might have published individual pieces without yet publishing a major book.

    That flexibility is why artists should treat “emerging” as a career-stage description rather than a permanent professional title.

    Emerging Does Not Mean Beginner

    One of the biggest misconceptions is that an emerging artist must be learning basic artistic skills. Usually, that is not the case.

    A serious emerging painter, photographer, musician, sculptor, writer, filmmaker, or interdisciplinary artist may have spent years mastering their craft. What is still developing is their professional footprint.

    For musicians in particular, experimenting beyond an established project can be part of that development, which is why understanding what is a side project in music can provide useful context for how artists explore new creative directions while continuing to build their primary careers.

    Artist Communities Alliance provides a useful example. Its MacColl Johnson Fellowship criteria describe emerging artists as people in the early years of professional practice who already have a substantive body of work and may have begun receiving critical notice, commissions, programming, or presentations.

    In other words, “emerging” does not necessarily mean inexperienced. It often means professionally developing. Building a professional art career involves developing a body of work while also learning how to navigate opportunities, visibility, and professional relationships.

    The Five Signs an Artist Is Emerging

    The Five Signs an Artist Is Emerging

    Instead of asking how old an artist is, look at what is happening in their career.

    They Are Creating Consistently

    An emerging artist normally has more than isolated experiments. There should be an evolving body of work that demonstrates continuing artistic activity.

    That might mean a series of paintings, several completed films, a portfolio of photography, published writing, recordings, performances, installations, or another sustained creative practice.

    Their Work Has Started Reaching the Public

    The transition from hobbyist to professional practice often becomes clearer when the work begins moving beyond the artist’s private space.

    That could include juried exhibitions, artist-run spaces, community galleries, festivals, readings, performances, online exhibitions, professional publications, commissions, or sales.

    Recognition Exists, but It Is Still Developing

    An emerging artist may already have achievements.

    They could have won a small grant, completed a residency, appeared in local media, participated in several exhibitions, sold artwork, or developed an online following.

    What they generally do not yet have is a long, sustained record of national or international institutional recognition.

    They Are Building Professional Infrastructure

    Professional development is another useful signal.

    The School of the Art Institute of Chicago advises emerging artists to focus on visibility, participate in exhibitions, maintain an online presence, and develop professional materials such as artist statements and CVs.

    An artist who maintains a portfolio, documents work properly, submits applications, develops relationships and searches for professional opportunities is behaving differently from someone creating only for recreation.

    They Have Not Yet Reached Sustained Establishment

    This is perhaps the simplest dividing line.

    The artist has started attracting attention, but that attention has not become consistently broad or institutionally established.

    Emerging Artist vs. Amateur vs. Mid-Career Artist

    These labels are imperfect, but the distinction can be useful.

    Career stage Typical position
    Amateur or hobbyist Creates mainly for personal enjoyment, with professional development not necessarily being the goal
    Emerging artist Builds a professional body of work and begins gaining exhibitions, sales, commissions, publications or recognition
    Mid-career artist Has an established professional record and more sustained regional or national recognition
    Established artist Has a substantial long-term record, broad recognition and significant professional or institutional presence

    The boundaries are not fixed.

    Someone might appear mid-career according to one residency’s criteria but qualify as emerging under another grant’s rules.

    That is why artists should never rely solely on the label.

    Does an Emerging Artist Have to Be Young?

    Does an Emerging Artist Have to Be Young

    No. The emerging artist meaning describes career development more reliably than biological age.

    The Joan Mitchell Foundation’s former Emerging Artist Grant program explicitly described emerging artists as people early in their artistic careers regardless of age. Its definition also considered whether artists had developed major gallery representation, substantial exhibition histories, awards, commissions, or sufficient market establishment.

    This makes room for second careers.

    A 52-year-old accountant who develops a serious sculpture practice, begins exhibiting, receives a first residency, and starts selling professionally may reasonably occupy an emerging career stage.

    Meanwhile, a 29-year-old artist with extensive museum exhibitions and years of major representation may no longer fit it.

    A Quick Test: Are You an Emerging Artist?

    Ask yourself five questions.

    Have you produced a coherent body of work rather than occasional standalone pieces?

    Have you presented, published, performed, sold, or exhibited your work publicly?

    Are you actively seeking professional opportunities?

    Have you received some external recognition but not yet developed a sustained national or institutional profile?

    Are you building a career rather than simply exploring the activity recreationally?

    If most answers are yes, “emerging artist” may accurately describe your current professional position.

    But there is an important catch: if you are applying for a grant, residency, fellowship, or exhibition, the organization’s definition overrides your personal interpretation.

    Why the Label Matters in the United States

    Career-stage terminology can affect access to funding, residencies, exhibitions and professional development.

    The National Endowment for the Arts illustrates how artists’ careers can develop through opportunities, communities and institutional support, while its profiles also show that artistic careers rarely follow one standardized path.

    Residencies can be particularly important during this stage. Research published by Artist Communities Alliance found that residency experiences can contribute to new work, exhibitions, professional connections and longer-term support networks for participating artists.

    A music collective can provide another form of professional community, bringing artists together around collaboration, shared resources, creative exchange, and opportunities to develop their work and reach new audiences.

    That helps explain why emerging-artist opportunities frequently offer more than money. Mentorship, studio access, introductions, professional training and time to work may be equally valuable.

    Why the Definition Can Be Frustrating

    Why the Definition Can Be Frustrating

    The term sounds precise, but it is not.

    One funder may define emerging as one to five years of professional activity. Another may expect at least three years. Another may use exhibition history rather than years. Some programs allow career changers, while others impose geographic, education, age or professional-history requirements.

    That ambiguity is not necessarily a problem until someone assumes the term has the same meaning everywhere.

    Before applying for anything labeled “emerging artist,” read the eligibility language carefully. Check how the organization measures professional experience, exhibitions, representation, education, awards and career interruptions.

    If the wording remains unclear, contact the organization rather than reshaping your résumé to fit what you think the term means.

    Frequently Asked Questions

    1. What is the simplest emerging artist meaning?

    An emerging artist is a creator building an early professional career, with a developing body of work and some public recognition but without the sustained visibility usually associated with established artists.

    2. How long can someone be considered an emerging artist?

    There is no universal duration. Some programs specify a particular number of professional years, while others evaluate exhibitions, recognition, representation and overall career development.

    3. Can a self-taught artist be an emerging artist?

    Yes. Formal art-school education is not universally required. Professional practice, quality of work, public presentation and career development can matter more than a degree.

    4. Is an emerging artist the same as an unknown artist?

    Not necessarily. Emerging artists may already have exhibitions, awards, commissions, sales or press coverage. The term describes a developing professional position rather than complete lack of recognition.

    The Label Matters Less Than the Evidence

    Understanding the emerging artist meaning becomes easier once you stop treating “emerging” as an age bracket or measure of artistic talent. It is better understood as a temporary position in a professional journey.

    What matters most is the evidence surrounding the label: the work you have created, where it has appeared, how consistently you practice, who has recognized it and what opportunities you are ready to pursue next.

    For artists themselves, that is the useful takeaway. Do not spend too much energy trying to perfectly name your career stage. Build the record that makes your next stage unmistakable.

  • Independent Artist Revenue Split Streaming Platforms: The 2026 Reality

    Independent Artist Revenue Split Streaming Platforms: The 2026 Reality

    I spent my first three years as a DIY creator believing my distributor gathered every cent my catalog earned. When I audited my catalog statements against my raw stream counts, I realized I had left nearly 20% of my total earnings sitting in collection society escrow accounts.

    Understanding the independent artist revenue split streaming platforms pay out requires looking past aggregate stream counts. A single stream does not pay a flat statutory fee to a single party. Instead, every platform uses a multi-tiered revenue pool split across distinct legal copyrights.

    How the Streaming Revenue Pool Actually Works

    Digital streaming platforms (DSPs) such as Spotify, Apple Music, and TIDAL operate on a pro-rata revenue-share system rather than paying artists a fixed per-stream rate.

    The Platform Cut vs. The Rights-Holder Pool

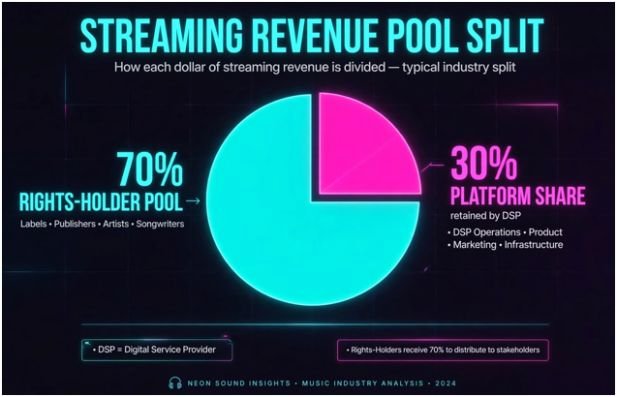
    Every subscription dollar and ad impression enters a localized pool. DSPs deduct their cut first before disbursing the remainder to copyright owners.

    Allocation Segment Approximate Share Recipient Entity
    Platform Share ~30% Retained by DSP for operational costs, bandwidth, and margin
    Rights-Holder Pool ~70% Disbursed to distributors, labels, publishers, and songwriters

    The 70% pool distributes according to market share: if an artist accounts for 0.01% of all eligible streams in a territory during a billing period, that catalog receives 0.01% of the available pool.

    The Split Breakdown: Master Rights vs. Publishing Rights

    The Split Breakdown: Master Rights vs. Publishing Rights

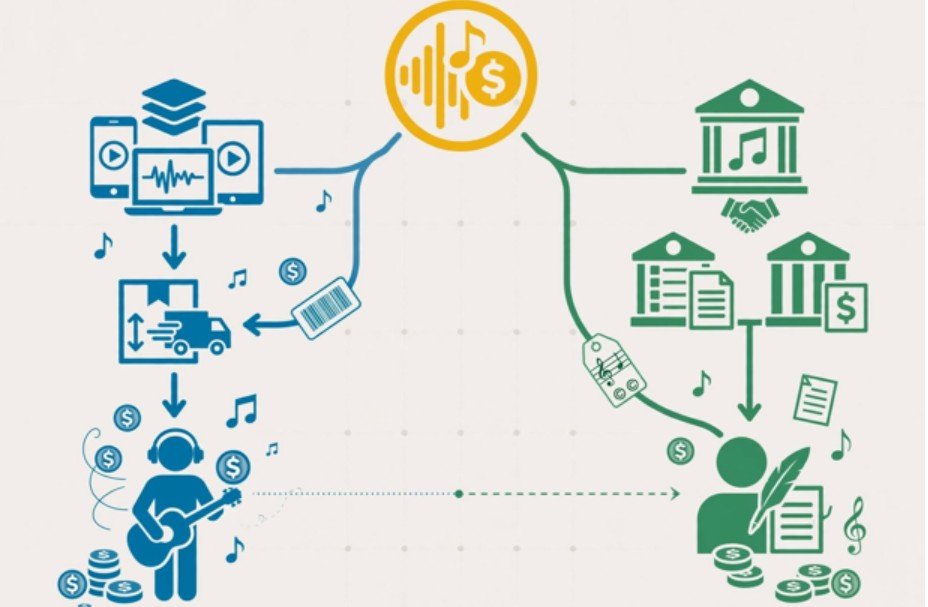
    When someone streams your track, you trigger two separate intellectual property assets governed by copyright law. The U.S. Copyright Office legally differentiates between the recorded audio and the underlying composition. If you write and record your own songs, you own both sides.

    Royalty Stream Percentage of Pool Collection Channel Required Registration
    Master Royalties ~80–85% DSP $\rightarrow$ Digital Distributor TuneCore, DistroKid, CD Baby
    Mechanical Royalties ~8–10% DSP $\rightarrow$ Mechanical Licensing Body The Mechanical Licensing Collective
    Performance Royalties ~6–8% DSP $\rightarrow$ Performing Rights Org (PRO) ASCAP, BMI, SESAC, PRS
    Non-Interactive Master Statutory (Varies) DSP $\rightarrow$ Statutory Collective SoundExchange

    Master Recording Royalties

    The sound recording (the master) claims roughly 80% to 85% of the rights-holder pool. This payout flows directly to your distributor. If you utilize modern independent music distribution, you keep 85% to 100% of this chunk depending on whether you pay a flat annual subscription or a backend commission.

    Composition and Publishing Royalties

    The remaining 15% to 20% belongs to the composition: the melodies, lyrics, and song arrangements. This bucket divides into two distinct parts:

    1. Mechanical Royalties: Generated when music is reproduced digitally via on-demand streaming.
    2. Performance Royalties: Generated when music is publicly performed, broadcast, or transmitted digitally.

    Distributors rarely collect publishing mechanicals or performance fees by default. Uncollected mechanicals land in the “black box” where unclaimed funds eventually get re-allocated to major publishers based on market share.

    DSP Payout Estimates Across Major Platforms

    DSP Payout Estimates Across Major Platforms

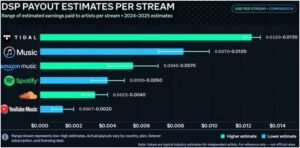
    Payouts fluctuate monthly based on subscriber location, subscription tiers, and local ad markets. Free ad-supported streams pay fractions of what premium family or individual accounts yield.

    Platform Estimated Effective Payout / Stream Primary Revenue Model Key Terms & Requirements
    TIDAL $0.012 – $0.013 Premium subscription only Artist-first model; highest consistent pool rate
    Apple Music $0.007 – $0.010 Premium subscription only No ad tier; consistent international rates
    Amazon Music $0.004 – $0.007 Hybrid (Prime vs Unlimited) Higher payouts tied strictly to Unlimited plans
    Spotify $0.003 – $0.005 Freemium / Ad-supported 1,000 streams minimum annually to generate royalties
    SoundCloud $0.0025 – $0.004 Fan-Powered Royalties Allocates subscription fees based on user listening habits
    YouTube Music $0.0007 – $0.002 Ad-heavy / Video hybrid Content ID monetization heavily affects payouts

    The Leaky Bucket: Where Unclaimed Royalties Vanish

    The Leaky Bucket: Where Unclaimed Royalties Vanish

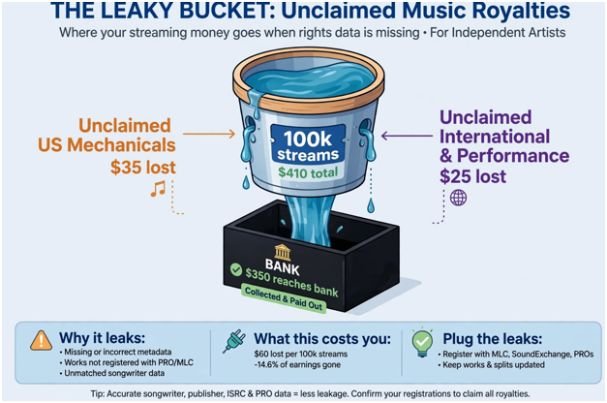
    Here is a live audit of an independent release generating 100,000 streams in the United States on Spotify, assuming a standard average master rate of $0.0035:

    • Gross Stream Payout Generated: ~$410
    • Master Distribution Cut (to your bank via distributor): ~$350
    • Unclaimed US Mechanicals (uncollected at The MLC): ~$35
    • Unclaimed International & Performance Royalties: ~$25
    • Total Value Abandoned: ~$60 per 100k streams

    Scale those numbers to 1,000,000 streams, and an unmonitored catalog surrenders $600 or more in uncollected publishing revenue.

    The Pipeline Fix: How I Set Up Complete Royalty Collection

    Securing your total earnings requires a coordinated release process. Before distributing your next track, complete this administrative checklist:

    1. Upload via Digital Distribution: Use your distributor to push audio to DSPs and assign your ISRC codes.
    2. Register with a PRO: Submit titles and splits to ASCAP or BMI to capture writer and publisher performance income.
    3. Register Works with The MLC: Add track titles, ISWCs, and corresponding audio ISRCs inside the member portal to receive direct mechanical distributions.
    4. Claim Tracks on SoundExchange: Register as both the Featured Artist and the Sound Recording Copyright Owner (SRCO) to capture digital radio performances from Pandora and SiriusXM.
    5. Enlist a Publishing Administrator: Use an admin publisher if you want automated collection of mechanical royalties outside the US without managing local societies yourself.

    Keep this workflow handy inside your self releasing an album checklist before every release date.

    Stop Donating Your Residuals

    Streaming margins remain lean, but abandoning your rights makes them thinner. Stop treating your digital distributor as a one-stop business manager. Claim your publishing registrations, match your ISRC codes, and collect every cent the algorithms generate.

    Frequently Asked Questions

    1. Does DistroKid or TuneCore collect my ASCAP and BMI royalties?

    No, digital distributors only collect master recording royalties, leaving performance collections to your PRO.

    2. What is the 1,000 stream threshold rule?

    Spotify requires tracks to hit at least 1,000 streams within 12 months before disbursing recorded royalties.

    3. How often do digital streaming services distribute payouts?

    DSPs process royalties on a 60- to 90-day delay, sending reports monthly to distributors and quarterly to PROs.

    4. What is the difference between an ISRC and an ISWC code?

    An ISRC identifies the recorded audio file, while an ISWC identifies the underlying musical composition.

  • Self Releasing an Album Checklist for Indie Artists: My 8-Week Roadmap

    Self Releasing an Album Checklist for Indie Artists: My 8-Week Roadmap

    I blew my first album release by uploading raw files directly to a distributor five days before launch. I earned zero playlist placements, neglected mechanical royalties, and burned out my audience with sporadic social posts. After years of producing records and managing releases, I built an organized system. This self releasing an album checklist for indie artists eliminates chaos, secures your revenue streams, and delivers your music to the right listeners.

    Whether you plan a full twelve-track LP or scaled back to release an independent ep, an eight-week runway remains the industry standard for a reason.

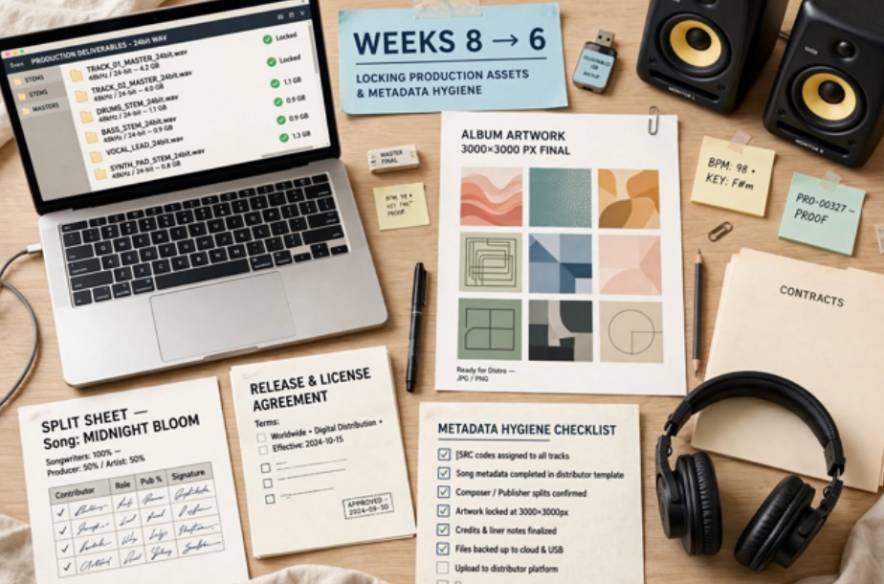
    Weeks 8 to 6: Locking Production Assets and Metadata Hygiene

    Weeks 8 to 6 Locking Production Assets and Metadata Hygiene

    Rushing production deliverables corrupts your release downstream. Your mixing and mastering engineers must deliver archival-quality files before you sign off on any distribution contracts.

    Clearing Rights, Splits, and Master Files

    Export your master audio as 24-bit, 44.1kHz uncompressed WAV files. Verify your artwork measures exactly 3000 x 3000 pixels at 300 DPI, configured in RGB color space. Streaming services reject artwork displaying social media handles, pricing stickers, or retailer logos.

    Never rely on verbal agreements for songwriting. Draft signed split sheets detailing the precise percentages owed to co-writers, topliners, and session musicians. If you used samples, clear both the master sound recording and underlying composition licenses now. Untangled publishing disputes freeze distribution assets and escrow royalty payouts indefinitely.

    Compile your metadata into a single offline document. Collect primary artist display names, featured performers, producers, engineers, and explicit content designations. Double-check the legal spelling of every contributor. Fixing spelling mistakes across digital service providers after release often takes weeks.

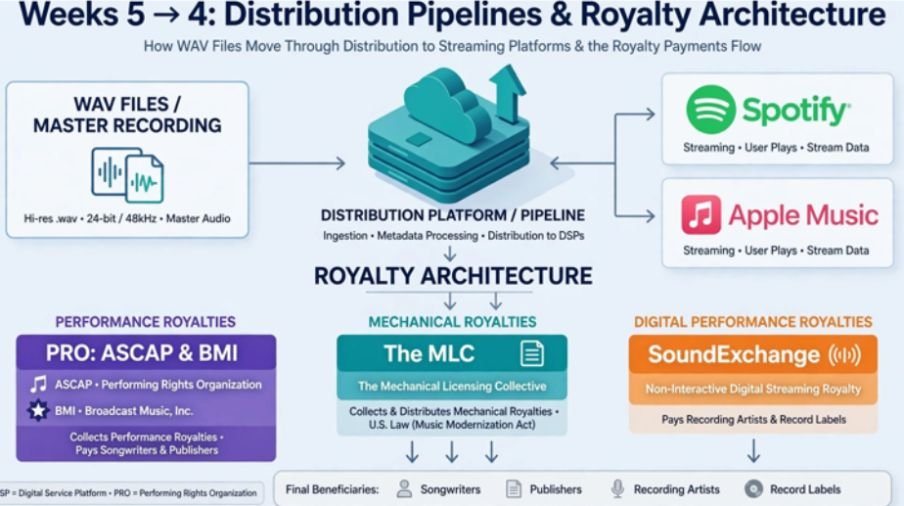
    Weeks 5 to 4: Distribution Pipelines and Royalty Architecture

    Weeks 5 to 4 Distribution Pipelines and Royalty Architecture

    Uploading your album a month in advance ensures you never miss a street date. Modern independent music distribution platforms need sufficient lead time to process, inspect, and ingest multi-track deliverables across global networks.

    Always select a Friday release date to synchronize with standard weekly platform updates and global charting windows.

    Platform / Entity Function Asset / Requirement
    Digital Distributor Ingestion to Spotify, Apple, etc. 24-bit WAVs, 3000x3000px Cover, Metadata
    PRO (ASCAP / BMI) Performance Royalty Collection Work Titles, Writer IPIs, Publisher IPIs
    The MLC Digital Audio Mechanicals Master Song Titles, ISRCs, Writer Splits
    SoundExchange Non-Interactive Digital Audio Royalties Master Recording ISRCs, Featured Artist Info

    Setting Up Mechanical and Digital Performance Pipelines

    Distributors deliver your songs to DSPs, but they do not collect your global songwriting royalties. Register your songs with your local Performing Rights Organization to secure broadcast and live performance revenue.

    Next, submit your catalog data directly to The MLC to collect domestic mechanical royalties generated by on-demand interactive streams. Pair this step with a complete catalog upload to SoundExchange, which recovers non-interactive digital performance royalties from satellite and internet radio broadcasts. Missing these steps leaves roughly 20% to 30% of your earned music revenue sitting in unclaimed black-box pools.

    Finally, build your smart pre-save link through platforms like Feature.fm or Hypeddit. This single page aggregates fan interest across all primary platforms.

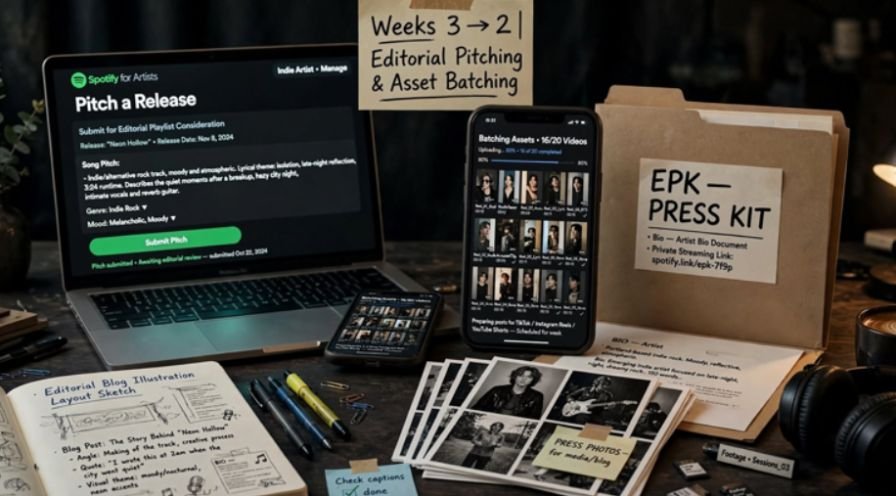
    Weeks 3 to 2: Editorial Pitching and Asset Batching

    Weeks 3 to 2 Editorial Pitching and Asset Batching

    With your release ingested and assigned unique ISRCs and UPCs, your streaming profiles will display the upcoming release in your creator dashboards. This begins your promotional campaign.

    Pitching Spotify Editorial Without Wasting Your Shot

    Log into your dashboard and follow the Spotify for Artists Pitching Best Practices to target human curators. You must pitch your chosen focus track at least 14 days before launch.

    Avoid generic descriptions in your pitch. Detail the musical instrumentation, identify complementary artists, specify your target audience demographic, and describe your external promotional budget.

    Alongside editorial playlist pitching, artists can learn how to get featured on independent music blogs and podcasts to expand their release campaign beyond streaming platforms.

    Pitching on time guarantees your single lands on your existing followers’ personal Release Radar playlists on morning one.

    Simultaneously, craft a lightweight Electronic Press Kit hosted on an unlisted webpage or cloud folder. Include:

    • A concise 250-word narrative bio framing the record’s sonic identity
    • Two high-resolution press photos in both horizontal and vertical crops
    • High-res album artwork files
    • A private, password-protected streaming link for journalists and playlisters

    During this quiet window, batch 15 to 20 vertical videos. Create short-form performance takes, lyric breakdowns, and behind-the-scenes recording footage. Trying to shoot, edit, and post video daily during release week causes immense stress. Bank your assets early.

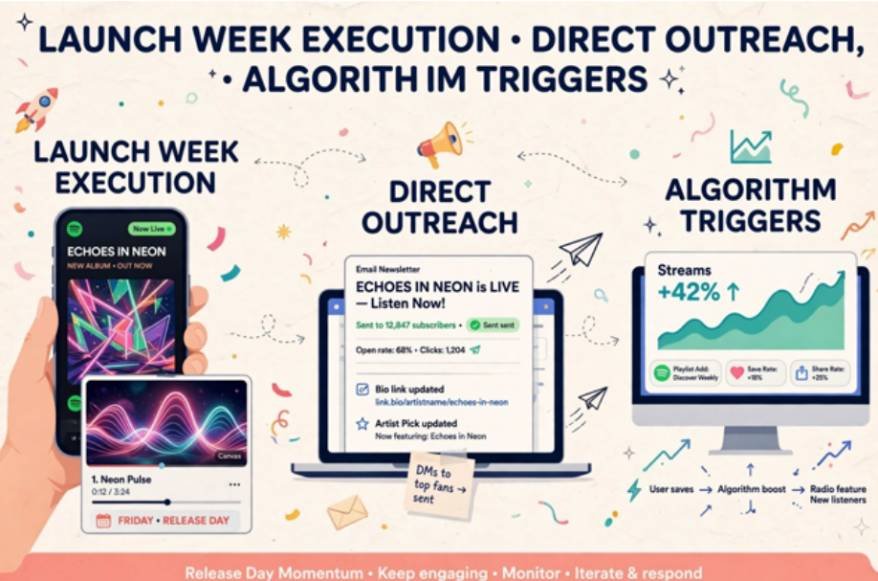
    Launch Week: Execution, Direct Outreach, and Algorithm Triggers

    Launch Week Execution, Direct Outreach, and Algorithm Triggers

    Friday morning brings the official rollout. First, audit every major storefront to ensure the album appears correctly without orphaned tracks, mismatched metadata, or split artist profiles.

    Swap the primary URL in your social bios to direct fans to your live smart link. Update your Artist Pick on your streaming profiles to prioritize the new album, and link your custom vertical Spotify Canvas videos to your focus tracks.

    Send an email newsletter directly to your core subscribers with clickable links to every service. Direct-to-fan email marketing repeatedly yields four times the conversion rate of standard social posting. Thank your engineers, visual artists, and collaborators publicly across your channels, tagging their handles to cross-pollinate reach.

    Post-Launch: The Second Wave and Algorithmic Momentum

    The work continues after the first weekend. Streaming algorithms analyze listening trends, skip rates, and playlist-add ratios during the initial 14-day window.

    Publish your batched social clips on a disciplined schedule. Respond to every user-generated clip, comment, and story mention within an hour of posting to keep platform engagement metrics high.

    Deliver secondary promotional assets during weeks two and three. Release an acoustic performance video, drop a visualizer for track four, or share an in-depth track-by-track interview. Continuous activity tells Spotify’s Discover Weekly algorithm that your release maintains organic interest beyond launch day.

    Frequently Asked Questions 

    1. How far in advance should I upload an album for distribution?

    Upload your album four to six weeks before your target release date to secure editorial pitching access and prevent technical delays.

    2. What is the ideal day of the week to release indie music?

    Friday is ideal for competing for algorithmic playlists, whereas a Tuesday or Wednesday release minimizes competition if you rely strictly on direct-to-consumer sales.

    3. Do I need a record label to collect streaming mechanical royalties?

    No, independent artists can collect their mechanical royalties directly by registering their catalog with The MLC and a publishing administrator.

    4. How much money should indie artists budget for marketing an album?

    Allocate at least 50% of your total project budget strictly toward external marketing, video assets, and targeted playlist pitching campaigns.

    Cut the Ribbon, Keep the Equity

    Self-releasing music requires discipline, careful project management, and patience. Following an established framework shields you from copyright roadblocks, missing royalty checks, and unforced distribution errors. Run through this roadmap, check off your production deliverables early, and focus on building genuine connections with your audience.

  • AI Songwriting Tools Versus Human Lyric Writing: Studio Truths

    AI Songwriting Tools Versus Human Lyric Writing: Studio Truths

    When I opened a blank project file last month, staring down a brutal deadline, I did something I used to consider sacrilege: I asked an algorithmic model to sketch my chorus. Sitting at the console comparing AI songwriting tools versus human lyric writing showed me that machines deliver breathtaking speed, yet they cannot bleed onto a page. Songwriting demands blood, sweat, and memory.

    The collision of machine learning and songwriting is not a zero-sum war. It is a fundamental shift in how artists assemble words, balance cadence, and protect their intellectual property.

    The Studio Reality: Speed Against Authentic Soul

    Generating forty couplets in three seconds feels like a superpower until you try singing them aloud. Generative engines process text based on mathematical predictability. They analyze billions of lines to predict which syllable statistically belongs next.

    That statistical average is the exact enemy of memorable music. For artists who value individuality and creative freedom, understanding what indie means in music provides useful context for why personal voice and unconventional songwriting choices can matter so much.

    Where Generative Algorithms Hit a Creative Wall

    Where Generative Algorithms Hit a Creative Wall

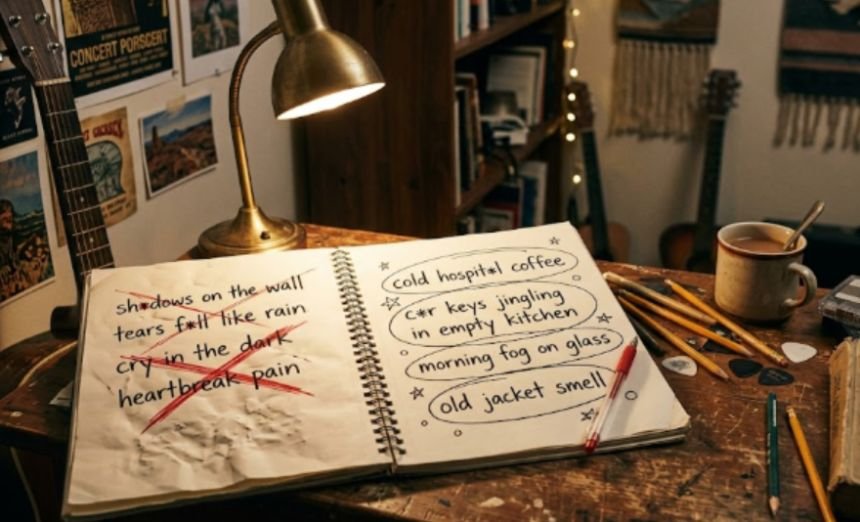
    Feed an engine a prompt about grief, and it gives you “shadows on the wall,” “echoes in the hall,” and “tears falling like rain.” The machine defaults to predictable AABB rhyme schemes and polished platitudes. It cannot capture the peculiar stench of cold hospital coffee or the sound of car keys jingling in an empty kitchen.

    Academic analyses from institutions like Berklee Online point out that while generative systems understand stylistic idioms, they lack cognitive context. They assemble language without understanding emotional weight. 

    When I tested a recent prompt asking for an indie-folk breakdown about estrangement, the engine served technically pristine stanzas. Yet, the lines were emotionally sterile. They sounded like a greeting card forced into four-four time.

    Why Human Vulnerability Survives the Mix

    Human lyricists write through the lens of lived friction. When songwriters create hooks, they do not rely on probabilistic math. They pull from private heartbreaks, cultural subtext, and unexpected sonic dissonances.

    A human writer knows when an imperfect slant rhyme hits harder than a perfect rhyme. Consider how great records balance cadence and silence. The hesitation before a confession in a bridge cannot be calculated by a neural network. Raw lived experience gives lyrics their sticky, enduring power.

    The Mechanics of Co-Creation: Building a Hybrid Lyric Workflow

    The Mechanics of Co-Creation Building a Hybrid Lyric Workflow

    Treating technology as an outright replacement produces disposable tracks. Treating it as a studio companion transforms your creative output.

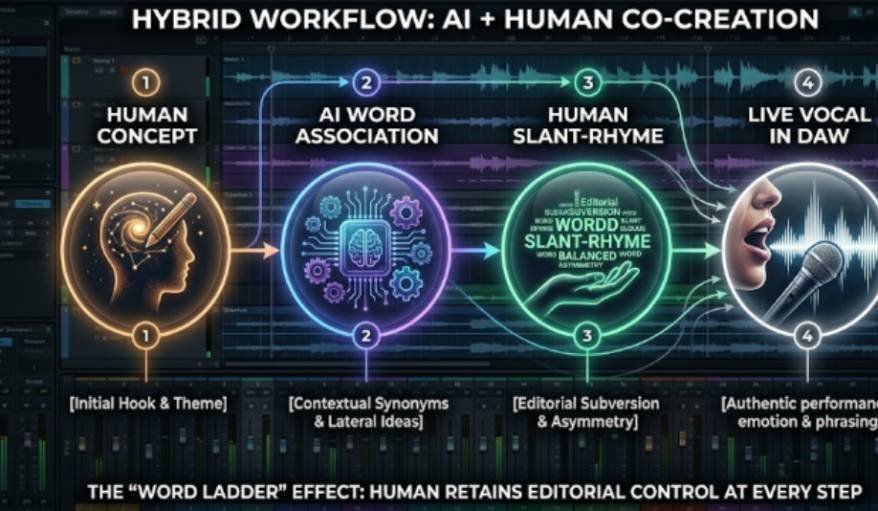
    I use text models as high-speed lateral thesauruses. When I get stuck on a repetitive rhyme scheme, I do not ask the tool to write the stanza. I ask it for fifteen concrete objects associated with a specific memory—like an abandoned coastal highway or a rusted radiator.

    My Hybrid Drafting Workflow:

    [Human Concept & Angle] 

             │

             ▼

    [AI Generates Atmospheric Word Association]

             │

             ▼

    [Human Selection & Slant-Rhyme Adaptation]

             │

             ▼

    [Live Vocal Phrasing & Structural Edits in DAW]

    Using Generative Engines as Contextual Rhyme Ladders

    If my chorus feels rhythmically stiff, I feed my draft into an engine and prompt: “Identify the meter of these lines and generate eight internal slant rhymes that avoid clichés.”

    The model acts as an interactive brainstormer. It suggests syllables I can twist, subvert, or discard entirely. The final phrasing remains entirely mine. This process saves hours of creative fatigue while keeping my personal voice at the center of the track.

    Protecting Your Copyright Footprint Inside Your DAW

    Protecting Your Copyright Footprint Inside Your DAW

    Using these systems introduces serious legal considerations. The U.S. Copyright Office maintains that only human-authored expression qualifies for legal protection. Merely entering prompts does not grant you authorship over the raw text.

    Furthermore, international frameworks monitored by WIPO highlight growing global friction regarding AI training datasets and intellectual ownership.

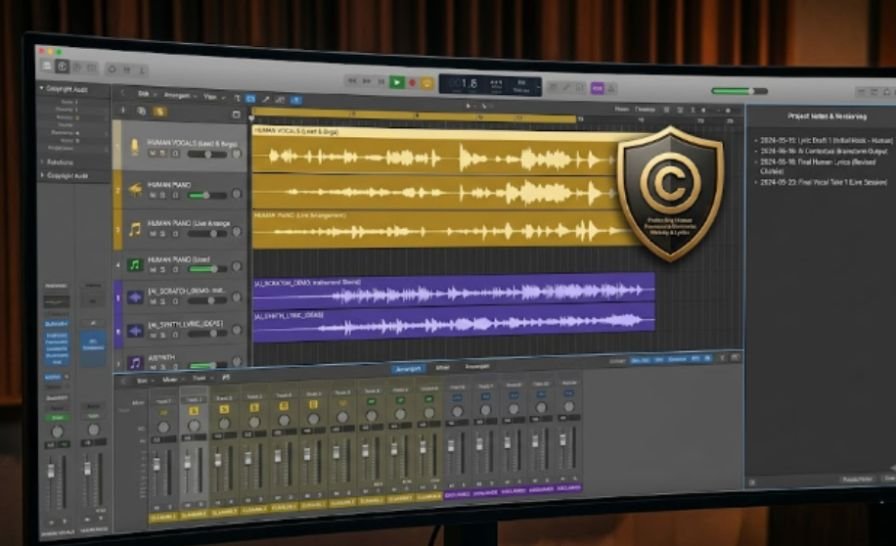
    If an algorithm writes your entire verse verbatim, anyone can legally take that lyric and release it on their own project. To protect my work, I maintain a strict audit trail in my Digital Audio Workstation:

    • Labeling channels clearly ([Human_Vocals] versus [AI_Scratch_Demo]).
    • Saving dated lyric drafts in cloud documents showing my handwritten modifications.
    • Disclaiming purely machine-generated backing loops during registration while claiming full ownership of my melody, arrangement, and lyrics.

    Why Algorithms Fail the Hook Test

    Modern listening habits demand immediate payoff. Because short form music is changing modern songwriting, listeners decide whether to skip a track within the first five seconds.

    Machines struggle with immediate, unconventional economy. AI lyrics tend to be excessively wordy. They pack too many syllables into a measure, crowding the vocal performance and destroying pocket presence.

    When you sing a melody across a syncopated groove, you often need an odd, asymmetrical phrase to snag the ear. Human intuition recognizes when a single nonsense word or an abrupt lyrical pause works better than a complete sentence. Algorithmic prediction smooths out those rough edges, stripping away the friction that makes a chorus hook an earworm.

    Stop Treating Tech Like a Threat—Treat It Like an Intern

    Stop Treating Tech Like a Threat—Treat It Like an Intern

    Stop waiting for a machine to write your masterpiece, and stop fearing that it will make your voice obsolete. 

    An algorithm is an intern: eager, lightning-fast, and completely devoid of taste. Use it to sweep up dead ends, generate wild word associations, and test arrangements. Then step up to the microphone, cut the digital fluff, and tell the truth that only you can tell.

    Frequently Asked Questions 

    1. Can I copyright lyrics that an AI generated for my song?

    No, purely machine-generated lyrics enter the public domain because copyright law requires human authorship.

    2. How do I use AI lyric tools without sounding generic?

    Use AI exclusively as an associative thesaurus for imagery, then manually rewrite every line using personal details and irregular slant rhymes.

    3. Do commercial licenses from AI platforms grant true copyright ownership?

    No, platform subscription terms only grant contractual permission to monetize, not statutory federal copyright protection.

    4. What is the most obvious sign of an AI-generated song lyric?

    Predictable AABB rhyming patterns, abstract emotional clichés, and overly dense syllable counts that disregard natural vocal phrasing.

  • Independent Music Distribution Without Major Label Backing: My Battle-Tested Blueprint

    Independent Music Distribution Without Major Label Backing: My Battle-Tested Blueprint

    Signing away my master rights to a predatory label was never an option for my projects. Executing independent music distribution without major label backing became my survival strategy. Bypassing the major label machine means you keep your copyright, retain 85% to 100% of your royalty revenue, and reach every global digital storefront within 72 hours.

    Direct uploads do not exist for everyday creators on platforms like Spotify or Apple Music. You must partner with an aggregator. Navigating this ecosystem requires clear math, an understanding of rights collection, and ruthless attention to metadata.

    Choosing Your Aggregator Model: The Real Math Behind the Fees

    Choosing Your Aggregator Model The Real Math Behind the Fees

    Aggregators generally use two models: recurring subscriptions or pay-per-release commission structures. Choosing the wrong setup eats your margins or drops your catalog from streaming stores when life gets busy.

    Artists working with limited release budgets can also explore music grant opportunities for independent artists to help offset distribution, production, and promotional expenses.

    For a closer look at pricing structures, royalty retention, and catalog policies, explore the best digital music distribution for independent musicians.

    I learned this the hard way when a missed billing notification threatened a year of back-catalog singles on an annual flat-fee service. Evaluate your release cadence before entering your card details.

    Flat-Fee vs. Commission Breakdown

    Distributor Model Cost Structure Royalty Retention Catalog Takedown Risk Best For
    Flat Annual Fee (e.g., DistroKid, TuneCore) ~$23–$40/year recurring 100% High (music pulled if subscription lapses unless paid extra) High-volume artists (4+ singles/year)
    Pay-Per-Release (e.g., CD Baby, EmuBands) ~$9.99–$20 one-time fee 91%–100% (CD Baby takes 9%) Zero (catalog remains live perpetually) Evergreen catalog releases & low-frequency drops
    Curated / Tiered (e.g., Symphonic, Too Lost) Revenue share (15%) or bespoke tier 85%–100% Low Artists with existing streaming traction & video needs

    Flat fees win if you upload tracks monthly. If you release sporadically, a permanent one-time fee protects your catalog from disappearing during dry spells.

    The Streaming Payout Reality: The 1,000-Stream Cutoff

    The Streaming Payout Reality The 1,000-Stream Cutoff

    Spotify’s payout rules require tracks to hit at least 1,000 streams within a trailing 12-month period to generate recorded music royalties. Below that threshold, your master streams earn $0.

    When planning your release cadence, direct your promotional energy toward pushing specific priority tracks past that milestone instead of spreading listeners across scattered releases.

    The Rights and Royalties Engine Behind Digital Music Distribution

    The Rights and Royalties Engine Behind Digital Music Distribution

    Distributor royalties only account for half your income. When an aggregator routes your audio through modern digital music distribution networks, you only collect the master interactive streaming payout.

    If you wrote the song, up to 40% of your earnings stay frozen across multiple collection societies unless you claim the composition side.

    Securing your creative assets through the U.S. Copyright Office provides legal foundation, but active pipeline registration drives your ongoing income.

    Master vs. Composition Payout Pathways

    Royalty Type Source Collection Agency Who Keeps It
    Interactive Master Royalty Spotify, Apple Music, Tidal Your Distributor (e.g., DistroKid) Sound recording owner (You)
    Digital Performance Royalty SiriusXM, Pandora, Webcasts SoundExchange Featured artist & master copyright owner
    Performance Royalties Terrestrial radio, venues, streams PROs (ASCAP, BMI, SESAC) Songwriter & Music Publisher
    Mechanical Royalties Interactive stream reproductions The MLC Songwriter & Music Publisher

    Link your metadata with correct International Standard Recording Codes (ISRC) for master tracks and International Standard Musical Work Codes (ISWC) for compositions. Missing these connections guarantees lost revenue.

    How I Release an Independent EP: A Tactical Setup Checklist

    When you prepare to release an independent ep, rush jobs lead to broken credits, lost playlist placements, and delayed streaming releases.

    Production Window Action Item Primary Objective
    4 Weeks Out Final Audio & Asset Export Master to -9 to -11 LUFS for dynamic punch; verify cover art meets 3000x3000px standards.
    3 Weeks Out Distributor Submission Upload track files, populate legal songwriter credits, and generate native ISRC/UPC codes.
    2 Weeks Out Editorial Pitching Access Spotify for Artists to draft your formal editorial pitch with genre tags and mood context.
    1 Week Out Short-Form Campaign Launch Deploy pre-save links, seed original audio on TikTok and IG Reels, and send bandcamp mailers.

    Never leave delivery to the final week. Aggregator review queues can back up, leaving your release date dead on arrival.

    Ditch the Label Handcuffs, Keep the Cash

    The old industry myth claimed you needed major label backing to find an audience. Modern streaming and short-form platforms prove that ownership, smart distribution choices, and systematic publishing collection yield far more leverage.

    Pick the right aggregator, register your performance rights, and build your release runway. Stop waiting for validation from an A&R representative who wants 80% of your work.

    Frequently Asked Questions 

    1. Does my music get removed if I cancel my distributor subscription?

    Yes, subscription platforms remove your music upon account cancellation unless you pay an add-on permanent legacy fee.

    2. What is the main difference between an ISRC and a UPC?

    An ISRC identifies a specific audio recording, while a UPC identifies the complete product release or album package.

    3. Can an independent artist distribute to TikTok and Instagram Reels?

    Yes, modern distributors deliver audio to Meta and TikTok sound libraries alongside traditional streaming platforms.

    4. Do I need a music publisher to collect mechanical streaming royalties?

    No, independent songwriters in the US can register directly with The MLC to claim their mechanical royalties at zero cost.

  • How to Reduce Echo in a Bedroom Studio Before It Ruins Your Mix

    How to Reduce Echo in a Bedroom Studio Before It Ruins Your Mix

    I can usually tell when a bedroom studio has too much room reflection before I even touch the EQ. Vocals feel farther away than they should, claps leave a sharp ring behind, and mixes become harder to judge because the room keeps adding its own sound to everything I hear.

    That is why learning how to reduce echo in a bedroom studio is one of the smartest improvements I can make before spending more on microphones, monitors, or plugins. In many US bedrooms and apartment setups, the main culprits are bare drywall, hard floors, windows, low ceilings, and closely spaced parallel walls. The good news is that I do not need a full commercial studio build to fix them.

    By treating first reflection points, softening hard surfaces, improving microphone placement, and controlling low-frequency buildup, I can create a noticeably cleaner recording and mixing environment without overcomplicating the room.

    Why Does a Bedroom Studio Sound Echoey?

    Sound from studio monitors, instruments, or a voice travels outward until it reaches a surface. Hard walls, windows, floors, ceilings, desks, and doors reflect much of that energy into the room.

    Because a bedroom is small, those reflections return very quickly. They can interfere with the direct sound and create flutter echo, harshness, boxiness, or an exaggerated sense of room ambience.

    Parallel walls are particularly troublesome. I can often identify flutter echo by clapping once and listening for a fast metallic ringing or repeated reflection.

    The goal of bedroom studio acoustic treatment is not to eliminate every reflection. I want enough sound absorption and control to hear recordings and mixes clearly without making the room unnaturally dead.

    Where Should I Put Acoustic Panels in a Bedroom Studio?

    I start with the first reflection points because treating them usually delivers one of the biggest improvements.

    These are areas where sound from the monitors hits a wall before bouncing toward my listening position. I can locate them with the mirror method. While I sit in my normal mixing position, another person moves a mirror along the side wall. Wherever I can see a monitor in the mirror is a likely first reflection point.

    Dense fabric-wrapped acoustic panels work especially well in these locations. Budget acoustic foam can reduce some high-frequency reflections, but thicker broadband panels generally absorb a wider frequency range.

    I also consider the wall behind the listening position. In a compact bedroom studio, reflections from this surface can return quickly. If ceiling reflections are strong, a ceiling cloud above the desk or listening area can provide additional control.

    Do Rugs Help Reduce Echo on Hardwood Floors?

    Do Rugs Help Reduce Echo on Hardwood Floors

    Yes, especially when the bedroom has hardwood, tile, vinyl, or laminate flooring.

    Hard flooring reflects a large amount of mid- and high-frequency sound, and the way those reflections behave can vary depending on amplitude and frequency. I prefer a thick area rug that covers a significant portion of the open floor between my workspace and the opposite side of the room.

    Adding a dense rug pad underneath can improve absorption further.

    A rug will not fix wall reflections or low-frequency room problems, but it can noticeably reduce the brightness and ringing that come from a large exposed floor.

    What Curtains Work Best for Bedroom Studio Windows?

    Glass is highly reflective, so uncovered windows can contribute significantly to room echo.

    I use heavy, floor-length curtains when possible. Thermal curtains, velvet drapes, or dense blackout curtains generally provide more absorption than thin decorative curtains.

    For US bedrooms with large windows or sliding glass doors, covering as much glass as practical can help reduce harsh reflections during recording and mixing.

    Curtains work especially well when combined with wall treatment rather than used as the only acoustic solution.

    Can Bookshelves and Bedroom Furniture Improve Studio Acoustics?

    Furniture can help, particularly in a room that would otherwise contain large empty reflective surfaces.

    A filled bookshelf with books arranged at different depths can scatter some reflections instead of sending them directly back toward the listener. Fabric storage boxes, soft furnishings, upholstered chairs, and a small couch can also help reduce excessive reflections.

    The bed itself is useful. A mattress, comforter, pillows, and other bedding absorb more sound than a completely bare wall or floor.

    I do not rely on furniture as a replacement for acoustic panels, but I use it as part of an overall DIY acoustic treatment strategy.

    Do Bass Traps Help in a Small Bedroom Studio?

    Do Bass Traps Help in a Small Bedroom Studio

    Low-frequency problems deserve separate attention.

    Low-frequency pressure often becomes strongest around room boundaries and corners. This can produce boomy bass, muddy mixes, and inconsistent low-end response.

    These room-related low-end problems are also important when learning how to make kick and bass not clash, because uncontrolled bass buildup can make it harder to judge the balance and separation between low-frequency elements.

    Installing thick bass traps in vertical corners can help control this energy and shorten low-frequency decay.

    Thin acoustic foam is not a substitute for bass trapping. Foam can help with flutter echo and higher-frequency reflections, while effective bass treatment generally requires thicker absorptive material.

    How Can I Reduce Echo While Recording Vocals?

    Microphone placement can sometimes improve a vocal recording before I add any new acoustic treatment.

    I avoid recording directly in a corner or placing the microphone close to a bare reflective wall. Recording closer to the microphone can increase the amount of direct voice relative to room sound, allowing me to lower the gain while capturing a cleaner signal.

    I can also position a thick acoustic panel, moving blanket, comforter, or other dense absorptive material around the recording area.

    When figuring out how to reduce echo in a bedroom studio, I always test several microphone and vocalist positions because a change of only a few feet can produce a noticeably different recording.

    Once the room and recording setup are under control, producers can also consider workflow tools and whether do I need a MIDI keyboard for music production based on how they prefer to create melodies, chords, and other MIDI parts.

    Is Acoustic Treatment the Same as Soundproofing?

    No. They solve different problems.

    Acoustic treatment controls reflections, reverberation, frequency buildup, and other sound behavior inside the room.

    Soundproofing aims to stop sound from entering or leaving the room. Proper sound isolation usually involves construction techniques such as adding mass, sealing air gaps, decoupling structures, and improving doors or walls.

    If a vocal sounds overly roomy, acoustic treatment is usually the priority. If traffic, neighbors, HVAC systems, or outside noise appears in the recording, sound isolation is the larger issue.

    How Do I Test Whether My Echo Treatment Is Working?

    I make one change at a time and compare the results.

    A simple clap test can reveal obvious flutter echo. I clap near the mixing or recording position and listen for metallic ringing.

    For vocals, I record the same spoken passage before and after changing the room. I keep the microphone position, gain, and distance consistent so I can make a fair comparison.

    I also play familiar commercial recordings through my studio monitors. Checking those same reference tracks through headphones can provide another useful perspective, especially when learning can I mix music with regular headphones and trying to understand how different monitoring environments affect mixing decisions.

    Better treatment should make stereo imaging, vocals, bass, and overall balance easier to judge.

    What Bedroom Studio Acoustic Treatment Mistakes Should I Avoid?

    Randomly covering walls with thin foam is one of the most common mistakes.

    Another problem is treating high frequencies heavily while ignoring bass. This can create a dull-sounding room while leaving low-frequency issues untouched.

    I also check monitor positioning before buying more treatment. Symmetry, speaker distance, desk placement, and listening position all affect what I hear.

    For me, the best approach is gradual: identify a problem, treat it, listen again, and only then decide what the room needs next.

    Frequently Asked Questions 

    1. What is the cheapest way to reduce bedroom studio echo?

    I would start with monitor and microphone placement, thick curtains, a rug with a pad, existing furniture, bedding, bookshelves, and moving blankets before investing heavily in professional treatment.

    2. Should I cover every wall with acoustic foam?

    Usually not. Strategic broadband absorption at reflection points provides better results than filling every surface with thin foam.

    3. How much acoustic treatment does a bedroom studio need?

    It depends on room dimensions, construction, furniture, speaker placement, and whether the space is mainly used for recording, mixing, or both. I start with the major reflection points and add treatment according to what I hear.

    4. How to reduce echo in a bedroom studio for vocal recording?

    Focus on microphone distance, recording position, nearby reflective surfaces, thick absorption, curtains, and temporary panels or blankets. Test multiple positions until the direct vocal becomes stronger than the room sound.

    5. Can a bookshelf work as acoustic treatment?

    A bookshelf can scatter some reflections, especially when objects have different depths and shapes. However, it should complement proper sound absorption rather than replace it.

    Final Thoughts

    When I think about how to reduce echo in a bedroom studio, I focus on solving the biggest problems first instead of buying every acoustic product I can find.

    I treat first reflection points, soften hard flooring, cover reflective windows, use furniture intelligently, control low-frequency buildup with bass traps, and improve microphone placement. I also test the room after every major adjustment.


    With thoughtful bedroom studio acoustic treatment, even a typical US spare bedroom or apartment bedroom can become a cleaner, more controlled environment for recording vocals, producing music, and making more confident mixing decisions.

  • Should You EQ Before or After Compression? Build a Cleaner Mix

    Should You EQ Before or After Compression? Build a Cleaner Mix

    A compressor can behave completely differently depending on what I feed into it. That is why I never treat EQ and compression as two plugins that can simply be dropped into a chain in any order. A muddy low end, sharp resonance, or aggressive EQ boost placed before compression can change the amount of gain reduction and, ultimately, the character of the entire track.

    So, should you EQ before or after compression? I usually clean up unwanted frequencies before the compressor and save broader tonal shaping for afterward. However, that is only a starting point. Sometimes I intentionally EQ first to make the compressor react harder to a particular frequency, while other times I compress a clean performance before touching its tonal balance.

    The key is understanding what I want the compressor to respond to. Once I approach the signal chain that way, choosing between corrective EQ, compression, and final tonal EQ becomes much easier—and the result usually sounds cleaner, more controlled, and more natural in the full mix.

    What Happens When You EQ Before Compression?

    Placing EQ before compression changes the signal that reaches the compressor detector. That matters because a compressor reacts to level, and some frequency ranges can carry significantly more energy than others.

    Low-end information is a common example. A recording can contain sub-bass rumble, proximity-effect buildup, HVAC noise, mic-stand vibration, or other frequencies that are not musically useful. Even when I barely hear them, they can still push the compressor harder and create unnecessary gain reduction.

    Using a high-pass filter or gentle low-frequency cut before compression can clean up the signal and help the compressor react more naturally.

    The same idea applies to resonant frequencies. If one narrow frequency suddenly jumps several decibels above the rest of the performance, the compressor may react to that spike and reduce the entire signal. Cutting the resonance first allows the compressor to respond more evenly.

    When Should You Use Corrective EQ Before Compression?

    I usually place corrective or subtractive EQ first when I need to remove something that should not influence compressor behavior.

    That may include low-end rumble, muddy frequencies, boxiness, harsh resonances, excessive proximity effect, or other peaks that make gain reduction inconsistent.
    The goal is not to completely reshape the sound. I simply want to give the compressor a cleaner and more balanced signal.

    This is especially useful with vocals recorded in untreated home studios, which are common among independent producers across the US. Room reflections, desk vibrations, background HVAC noise, and microphone placement can all introduce frequencies that affect the signal chain.

    Can Boosting EQ Before Compression Be Useful?

    Can Boosting EQ Before Compression Be Useful?

    Yes. EQ before compression is not limited to cutting frequencies.

    Boosting a specific frequency range before compression makes that range hit the compressor harder. That can be useful when I intentionally want the compressor to react more aggressively to part of the spectrum.

    For example, emphasizing upper-mid frequencies or sibilance before compression can create a basic frequency-sensitive compression effect. In some cases, producers use this idea as a crude form of de-essing or dynamic shaping.

    I use this technique carefully because aggressive boosts can cause pumping, excessive gain reduction, or a flattened sound. Pre-compressor boosts are most effective when I have a specific reason for changing detector behavior.

    What Happens When You Compress Before EQ?

    Compression first allows me to control the dynamic range before I make broad tonal decisions.

    This works well when the recording already sounds balanced but has inconsistent peaks or volume changes. I can stabilize the performance first and then make EQ choices based on the compressed result.

    Compression can also change how I perceive tone. Once quieter details become louder, and peaks become more controlled, a vocal may feel warmer, darker, brighter, or more forward than it did before processing.

    That is why post-compression EQ is often easier for final tonal shaping.

    When Should You EQ After Compression?

    I usually EQ after compression when I want to add color rather than fix a problem.

    This may involve adding vocal air, increasing presence, restoring brightness, adding warmth, or bringing more attack to a snare drum. I also make these tonal decisions before adding effects like reverb on vocals, because a well-balanced compressed signal usually gives me a cleaner and more controlled foundation for ambience.

    Heavy compression can sometimes make a transient-heavy sound feel dull or reduce some of its perceived punch. Post-compression EQ gives me a chance to restore those qualities without changing how the compressor reacts.

    Broad musical EQ adjustments also become more predictable because the signal’s dynamic range has already been controlled.

    EQ Before or After Compression for Vocals?

    EQ Before or After Compression for Drums?

    Vocals are probably the clearest example of why processor order matters.

    If I hear low-end rumble, mud, strong resonances, or an unpleasant frequency peak, I usually address those issues before compression. Otherwise, those frequencies may trigger unnecessary gain reduction.

    Once the vocal is compressed, I listen again and decide whether it needs more presence, air, warmth, or clarity.

    This often leads to a chain like:

    Corrective EQ → Compression → Tonal EQ.

    When I decide whether you should EQ before or after compression for a vocal, I focus on the purpose of each move rather than following a fixed plugin order.

    EQ Before or After Compression for Drums?

    Drums can benefit from either approach depending on the sound I want.
    If a kick contains excessive sub energy, I may clean that up before compression so the compressor does not pump too aggressively. If a snare has a strong ringing resonance, I can cut it before compression and then shape attack or brightness afterward.

    On the other hand, I may intentionally leave more low-end or transient energy in the signal when I want the compressor to react strongly and create a more aggressive drum sound.

    That is why compressor placement becomes part of the creative process, not just a technical decision.

    EQ Before or After Compression for Bass?

    Bass frequencies contain a lot of energy, so small tonal imbalances can have a large effect on compression.

    If one note or frequency range dominates the compressor, corrective EQ before compression can make the bass more consistent.

    If the bass already has a balanced tone, I may compress first and use EQ afterward to help it sit around the kick, guitars, keyboards, or other low-mid elements.

    The decision depends on whether I am correcting the source or shaping it inside the full mix.

    Can You EQ Both Before and After Compression?

    Yes, and this is often the most flexible approach.

    Using one EQ before compression lets me clean the incoming signal. The compressor can then control dynamics more predictably. A second EQ afterward lets me make broad, musical tonal changes.

    Some engineers call this the “EQ-compression-EQ” or “sandwich” approach.

    It works especially well on vocals, acoustic instruments, drum buses, and other complex sources that need both cleanup and polish.

    The main risk is over-processing. Adding more plugins does not automatically improve a mix, so I keep each move intentional and relatively small.

    What Are the Trade-Offs of Each Signal Chain?

    EQ before compression gives me more control over what triggers gain reduction, but aggressive boosts can create pumping or cause the compressor to work too hard.

    Compression before EQ keeps tonal shaping independent from compressor behavior, but problematic frequencies still reach the compressor and may affect its response.

    Using EQ before and after compression offers the greatest flexibility, but it also creates more opportunities to over-process the signal.

    The best choice is the one that solves the actual problem with the fewest unnecessary moves.

    Common EQ and Compression Order Mistakes

    Common EQ and Compression Order Mistakes

    One mistake I avoid is automatically applying large EQ boosts before compression. Those boosts can change the compressor response far more than expected.

    Another common mistake is leaving obvious low-frequency problems untreated and then trying to fix pumping with compressor settings alone.

    I also level-match whenever possible. A louder processed signal can sound better simply because it is louder, even when the processing itself is not helping.

    Most importantly, I make decisions while listening to the full mix. A vocal or instrument can sound impressive in solo and still compete badly with everything else.

    Frequently Asked Questions (FAQs)

    1. Is EQ Better Before or After Compression?

    Neither order is always better. Corrective EQ often works well before compression, while tonal EQ often works well afterward.

    2. Should Subtractive EQ Come Before Compression?

    Often, yes. Removing problematic frequencies first can stop them from triggering unnecessary gain reduction.

    3. Should Additive EQ Come After Compression?

    Additive or broad tonal EQ often works well after compression because it lets you shape the final sound without changing compressor behavior.

    4. Can I Boost EQ Before a Compressor?

    Yes. Boosting a frequency before compression can intentionally make the compressor react more strongly to that range, but excessive boosts may cause pumping.

    5. Does Compression Change Frequency Balance?

    Compression does not work like a traditional EQ, but it can change perceived tonal balance by bringing quieter details forward and changing the relationship between peaks and sustained sounds.

    6. Can I Use Two EQ Plugins With One Compressor?

    Yes. One EQ can handle corrective cleanup before compression while another handles tonal shaping afterward.

    Final Thoughts

    There is no single plugin order that works for every recording. When I ask whether you EQ before or after compression, I first decide whether I am fixing the incoming signal or shaping the finished tone.

    If unwanted low frequencies, mud, or resonances are affecting gain reduction, I use corrective EQ first. If I want to add air, warmth, presence, or final polish after controlling dynamics, I EQ afterward.

    For many mixes, the most practical workflow is corrective EQ, compression, and tonal EQ. Once I understand how each processor affects the next one, the signal chain becomes much easier to build with purpose.

  • How to Release an Independent EP Step by Step: A Complete Roadmap

    How to Release an Independent EP Step by Step: A Complete Roadmap

    I spent five months recording my first self-produced project, exported the audio, and uploaded it to a distributor forty-eight hours before my chosen Friday release date. The result was radio silence: zero algorithmic playlist traction, no editorial review, and hundreds of dollars in mechanical royalties left completely uncollected.

    Learning how to release an independent ep step by step requires treating your release strategy with the same surgical precision you bring to the mixing console. An Extended Play (EP) is your most potent calling card. It defines your sonic identity without demanding the exhausting promotional runway of a twelve-track LP.

    Follow this practical, timeline-tested framework to protect your royalties, leverage streaming algorithms, and deliver your music to listeners globally.

    Phase 1: Locking Down Production Assets and Technical Metadata

    Phase 1 Locking Down Production Assets and Technical Metadata

    Before uploading a single file to a server, lock your creative and technical assets. Tweaking a master or fixing a typo after distribution initiates ingestion delays that can derail an entire promotional timeline.

    Audio Formatting and Strict Delivery Standards

    Export your final masters from your mastering engineer as uncompressed WAV files at 24-bit / 44.1 kHz or 24-bit / 48 kHz. Avoid delivering MP3s or files with inter-sample peaks that clip during Digital Signal Processing (DSP) encoding. Check that track filenames follow a clean, standardized naming structure:

    TrackNumber_ArtistName_SongTitle_Master_24-44.wav

    Cover Art Specifications and Rejection Traps

    DSP ingestion systems automatically flag artwork that fails standard delivery parameters. Design your graphics to meet these baseline rules:

    • Strictly square aspect ratio (1:1), sized between 3000 × 3000 and 4000 × 4000 pixels.
    • Formatted in RGB color space as high-quality JPG or PNG files.
    • Free from retailer logos, social media handles, website URLs, barcodes, pricing, or pixelated imagery.

    Ensure the artist name and project title on the art match your metadata verbatim. A disparity between “EP” on the cover and “E.P.” in the distribution field can trigger a metadata rejection during ingestion.

    Phase 2: Selecting Distribution and Scheduling the Ingestion Window

    Independent artists cannot upload directly to Spotify, Apple Music, or Tidal. You need a trusted distributor to pipe your music, metadata, and licensing codes into each digital storefront. Choosing the best digital music distribution for independent musicians depends on your release cadence, budget, and how you want to manage your catalog over time.

    Evaluating Distribution Models for Multi-Track Projects

    Navigating digital music distribution for independent musicians comes down to your release cadence:

    • Annual Flat-Fee Services (e.g., DistroKid, TuneCore): Ideal if you release music frequently. You pay a predictable annual subscription to keep unlimited tracks live.
    • Pay-Per-Release Platforms (e.g., CD Baby): Ideal for artists who release projects intermittently and do not want to maintain an annual fee to prevent their catalog from being taken down.

    The Strategic Lead Time: Why Six Weeks Is Non-Negotiable

    Upload your assets at least six weeks prior to your official release date. Distributors require three to five business days to inspect and deliver your files to platforms. 

    Furthermore, Spotify requires your tracks to sit inside their backend system for a minimum of seven business days before release to ensure inclusion in your followers’ Release Radar playlists. 

    Six weeks gives you breathing room to troubleshoot metadata errors and execute an editorial pitch without panic.

    Phase 3: The Waterfall Release Strategy That Compounds Streams

    Phase 3 The Waterfall Release Strategy That Compounds Streams

    Dropping all five tracks of an EP simultaneously is an outdated approach for independent acts. When you dump an entire project at once, Spotify’s editorial curators only let you pitch one song, leaving the remaining four without editorial consideration.

    The modern industry standard is the Waterfall Strategy.

    Single 1 Drop:       [Track 1]

    Single 2 Drop:       [Track 2] + [Track 1]

    EP Release Day:      [Track 3] + [Track 4] + [Track 5] + [Track 2] + [Track 1]

    To execute this, release your lead single first. Four weeks later, release your second single as a two-track package that includes the first single. When the full EP lands, it houses the previous singles alongside the unreleased tracks.

    The Golden Rule: Always reuse the exact same International Standard Recording Code (ISRC) for each recurring track. Reusing the ISRC ensures that the play counts, playlist inclusions, and algorithm history from Single 1 seamlessly roll into the full EP release rather than resetting to zero.

    Phase 4: Pitching Editorial Curators and Setting Up Pre-Saves

    Phase 4 Pitching Editorial Curators and Setting Up Pre-Saves

    Once your distributor delivers the files, the project appears in your artist dashboard. Now you can initiate your direct playlisting outreach.

    Crafting the 500-Character Spotify Editorial Pitch

    According to Spotify for Artists pitch guidelines, curators evaluate thousands of submissions daily through a strict 500-character description field.

    Cut the self-praising adjectives and focus exclusively on sound, context, and promotional leverage. Understanding curated user playlists vs editorial pitching can help independent artists decide where to focus their playlist promotion efforts.

    Structure:

    [Sonic Hook & Sub-genre] + [2 Comparable Artists (FFO)] + [Core Theme/Story] + [Target Playlists] + [Concrete Marketing Commitment]

    Tested 480-Character Pitch Example:

    “Static Bloom” is an upbeat indie-rock track driven by chorus-heavy guitars and driving percussion. FFO: Sam Fender, The War on Drugs. Written in a home studio during winter isolation, capturing the friction between creative ambition and creative burnout. 

    Target playlists: ‘Fresh Finds Indie,’ ‘Undercurrents.’ Supported by a $600 Meta conversion campaign targeting indie fans, a four-city regional tour kicking off next month, and high-rotation short-form video previews. (488 characters)

    High-Intent Pre-Save Funnels

    Do not rely on a standard streaming link until the song is live. Build an unreleased smart link using services like Feature.fm or Hypeddit. When fans pre-save your project, they authorize the platform to add the EP directly to their libraries the second it goes live at midnight. A high concentration of first-day saves signals to the algorithm that your release has genuine listener demand.

    Phase 5: Registering the Backend Rights to Collect Every Royalty

    Distributors collect your master recording royalties from streaming services. However, if you wrote the songs, your distributor leaves roughly half your money on the table. You must register your catalog with the organizations designed to capture performance and mechanical income.

    Composition vs. Sound Recording: The Four Royalty Streams

    Royalty Type Source Collection Agency
    Master Streaming Interactive streams (Spotify, Apple) Your Digital Distributor
    Performance (Composition) Terrestrial radio, venues, streaming sync PROs: ASCAP, BMI, or PRS
    Digital Performance (Master) Non-interactive streaming (Pandora, SiriusXM) SoundExchange
    Mechanical Royalties On-demand streaming reproductions The MLC

    Register with a Performing Rights Organization (PRO) like ASCAP or BMI to capture your performance royalties. Next, set up an account with SoundExchange to collect non-interactive digital transmission money. 

    Finally, register your song titles and splits with The Mechanical Licensing Collective (The MLC). The MLC is a congressionally mandated nonprofit that collects and distributes digital audio mechanical royalties in the United States.

    Phase 6: Release Week Execution and Algorithmic Momentum

    Phase 6 Release Week Execution and Algorithmic Momentum

    Release day is the midpoint of your campaign, not the finish line. When Friday arrives:

    • Refresh Digital Storefronts: Update your artist banners, profile pictures, and “Artist Pick” on Spotify and Apple Music to feature the new EP artwork.
    • Direct High-Value Traffic: Point your most dedicated listeners to Bandcamp for digital downloads and physical merch. Direct purchases deliver immediate cash flow that streaming micro-cents cannot match early on. Independent musicians can also explore other ways to make money without touring, including digital sales, licensing, memberships, and other music-related income streams.
    • Deploy Short-Form Video Hooks: Post raw, behind-the-scenes clips, songwriting breakdowns, and performance videos across TikTok, Instagram Reels, and YouTube Shorts. Focus on the core emotional hook of your lead single.

    Frequently Asked Questions

    1. How many tracks should an independent EP have?

    An EP typically contains three to six tracks with a total run time under thirty minutes.

    2. How much does it cost to release an EP independently?

    Distribution and rights registrations run between $20 and $150, excluding production, mixing, and promotional ad budgets.

    3. When should I upload my EP to my distributor?

    Upload your audio and metadata four to six weeks before your target release date to guarantee playlist consideration.

    4. Does copyrighting my EP happen automatically?

    Copyright protection exists upon creation, but registering your work with the U.S. Copyright Office is required before filing an infringement lawsuit.

    Stop Sitting on Your Masters: Your Launch Sequence Starts Today

    The difference between an overlooked release and a sustainable release comes down to organizational discipline. When you protect your metadata, build a sensible runway, and pitch with facts instead of fluff, your music stands the best chance of finding its true audience. Run through your checklist, schedule your upload window, and share your project with the world.